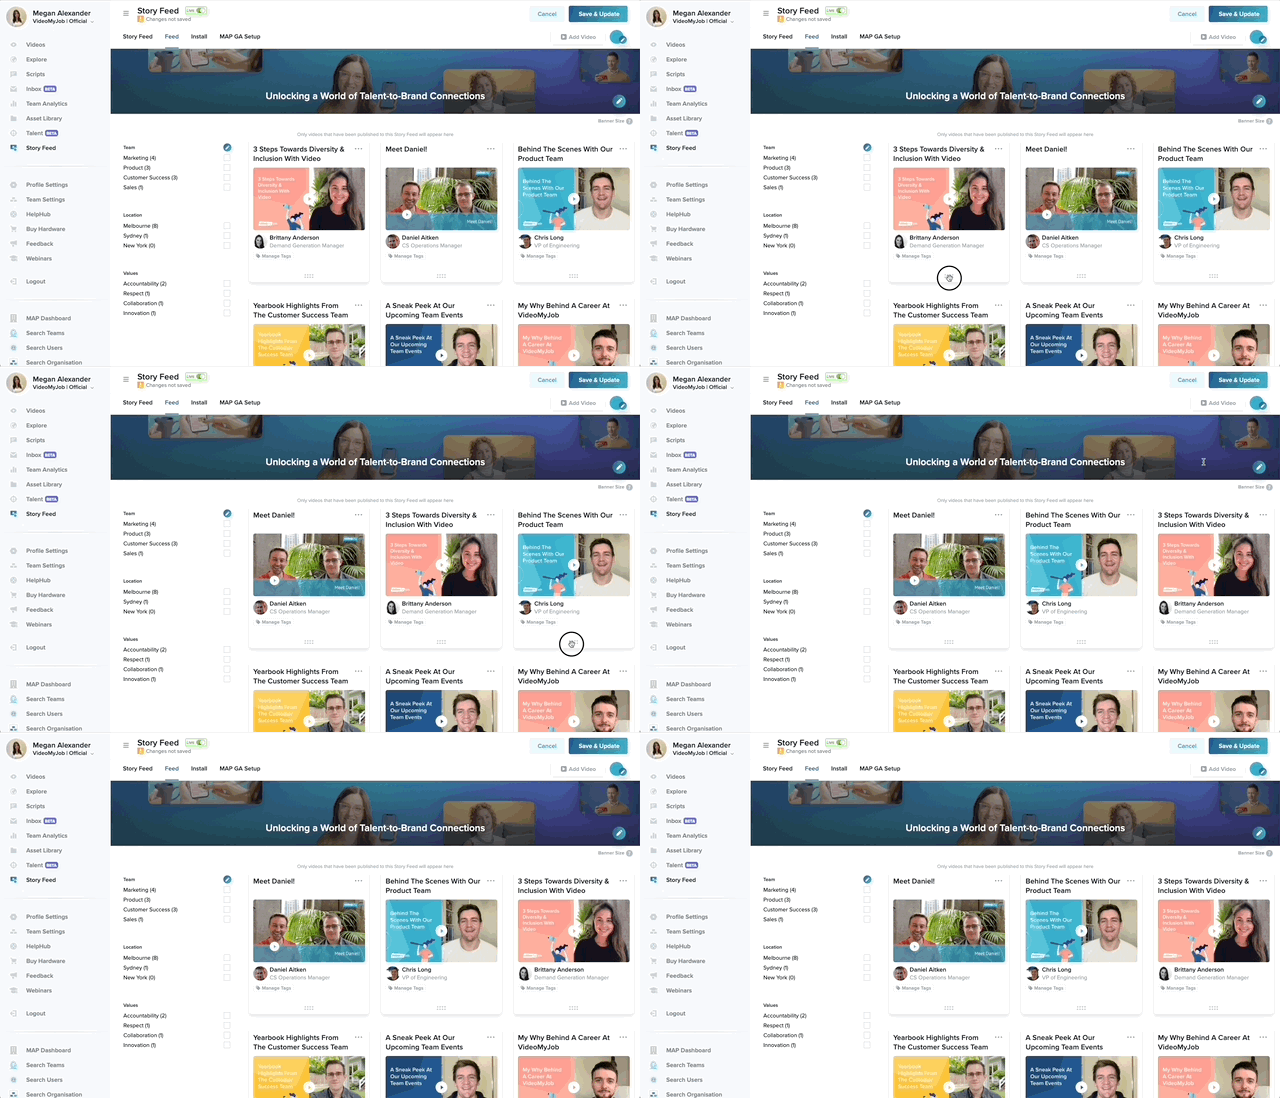
How to Set-up Your Story Feed
Learn how to install and go live with your Story Feed in VideoMyJob
Step 1: Check Install Code for Story Feed
Note: You will need a web developer or tech support to help with the install step.
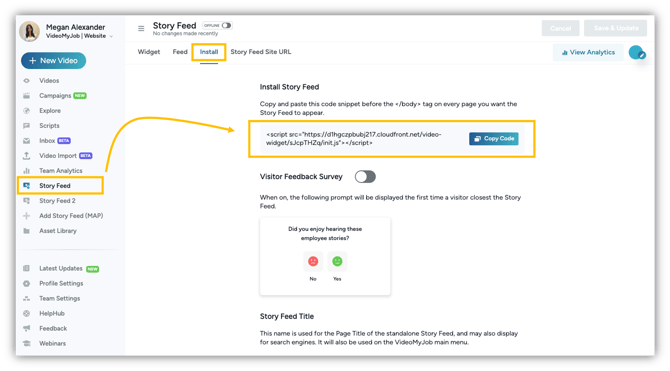
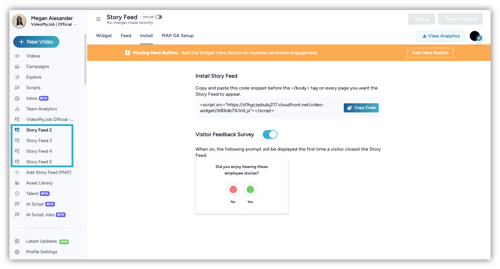
- On the Web Dashboard navigate to the Story Feed page and select the Install tab
- Click the Copy Code button and either add the code to your webpage, or send it to your web developer instructing them to "add the code before the </body> tag on every page you want the widget to appear
- While you wait to hear back from your tech team, go to Step 2 and start building your Story Feed
Step 2: Set-up your Branding
This is a great opportunity to brand your Story Feed with your logo, brand colours and banner. This is also where you add your CTA (call-to-action) giving your audience clear steps to follow that guides them through the talent acquisition funnel.
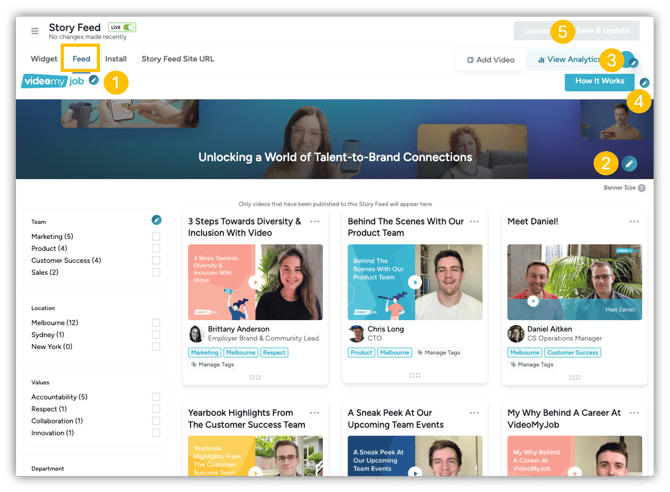
To get started, go to the "Feed" tab and follow the below steps to set this up;
- Add your company logo
- Add a hero banner and Story Feed heading
- Choose your hyperlink colour
- Optional but highly recommended call-to-action button. CTA examples - Apply Now, Learn More, Join the Team
- Save & Update to ensure all your updates are saved.
Step 3: Add Your Tags
Adding tags is the perfect way to categories your videos into specific topics and interests, helping viewers search and filter content based on their interests. Follow these steps to set up your tags in Story Feed;
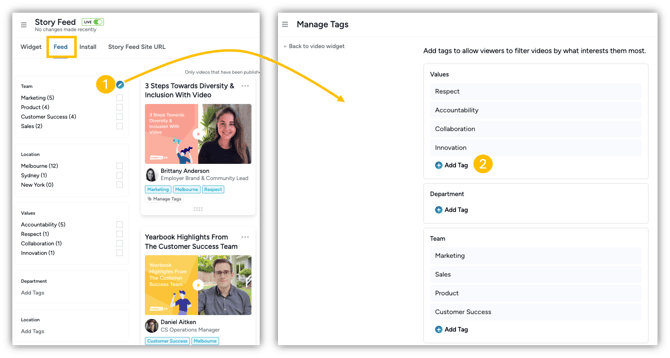
- Navigate to the Feed tab from your Story Feed page, and select the pencil icon to edit and/or add Tags
- This will take you to the "Manage Tags" window where you can add and delete tags based on your categories. Examples could include - Department, Location, Topic etc
Step 4: Add Your Videos
To successfully complete this step, you will need to have all your videos branded and published. Then you can easily follow the below steps to add them to your Story Feed;- Navigate to the Feed tab from your Story Feed page
- Click the Add Video button
- Search for the video/s you want to add
- Click the Add button
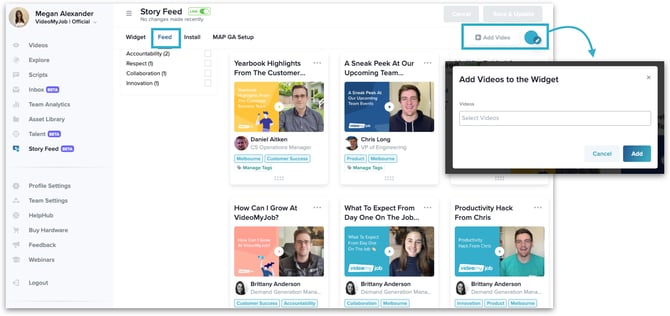
Note: Story Feed requires at least 3 videos to appear on your website
Step 5: Manage Your Tags on your Videos
Now that you've added all your videos to Story Feed, you can manage tags on each individual video to ensure they are categorised based on the specific topics and interests;
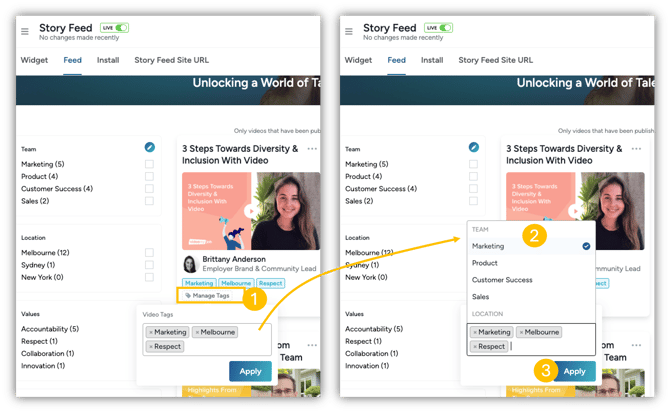
- Select "Manage Tags" on the video, then click in the "Video Tags" box
- This will bring up a list of tags you've already created in Step 3, allowing your to now tag your video accordingly.
- Click "Apply" to ensure your changes are saved!
Step 6: Re-Order Your Videos
- From the Feed tab, click and drag the grip icon at the bottom of the video tile
- Once you have your videos in the order you want, click Save & Update in the top right corner
Step 7: Select Your Featured Widget Videos
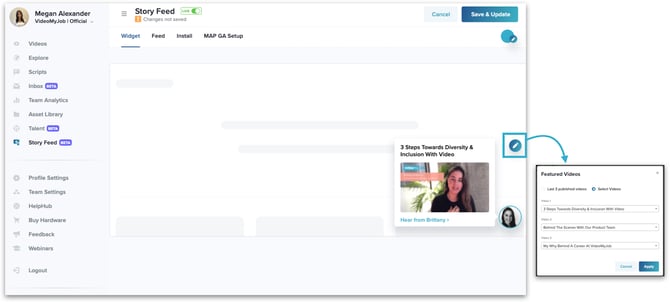
Featured videos are the 3 videos that appear in the small widget in the bottom right corner of your website when the widget is set to Live. By default this will display the 3 most recent videos, however this can be customised.
To set your featured videos:
- Navigate to the Widget tab
- Click the pencil icon, then select Featured Videos
- Click the Select Videos radio button, then select your videos
Step 8: Go Live 🚀
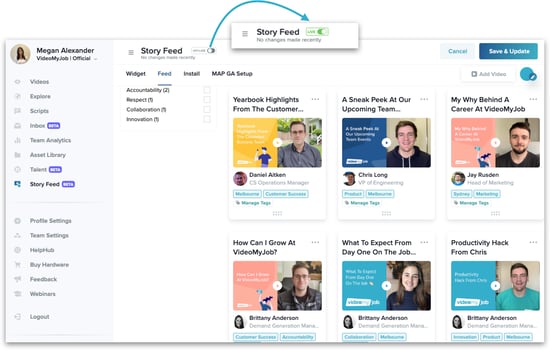
Once you're ready to go live with your Story, navigate to the top of the Story Feed screen and toggle from Offline to Live.
Step 9: Story Feed Landing Page
Once your Story Feed is live, this will automatically create a dedicated landing page for your Story Feed complete with a unique URL, making it easier to share content.
Each video in your Story Feed will have a unique URL as well. Use deep linking to target specific employee stories or testimonials when reaching out to candidates. With tailored content links, you can engage potential candidates with more relevant and personalised messages, making your outreach even more impactful.
Create Additional Story Feeds
Once you have your Story Feed up and running on your desired web page, you'll have the following options to add multiple Story Feeds to your Website;
- Add the identical Story Feed with the same video library to multiple web pages on your website or;
- Add a NEW additional Story Feed with a different video library to different page/s on your website
Option 1 - Identical Story Feed added onto other pages of your website:
Your Story Feed can exist on as many website pages as you'd like - there is no limit. Simply add the same Install Code (as shown in Step 1) to the webpages you would like the Story Feed to be accessed from, and the Story Feed with your full library of videos will visible from those webpages.
Option 2 - New Additional Story Feed with new video library added onto other pages of your website:
If you would like a completely different Story Feed with a different video library, then have a chat to your Account Manager and they will set this up so that it's live in your account.
You can then follow Steps 1 to 8 to create a brand new Story Feed.
This option is perfect if you would like to create a new library of employee stories for specific topics. For example, you can create a library of Graduate Employee Stories and add it to your Grad Program Web Page.
Advanced Troubleshooting
If you've done the basic troubleshooting steps for your Story Feed and it still isn't showing, here are advanced fixes you may need to apply. Important: these should be completed by your web site administrator or someone with knowledge of the below technologies
Advanced: Z-Indexes
Z-indexes can be tricky on certain editors and web templates. Use this snippet to raise the VideoMyJob Story Feed in front of other website content
.vmj-widget-area {
z-index: 99999999 !important;
}
Advanced: Content Security Policy (CSP)
Advanced: Implementing (CSP) is good practice for the security of website users. This can prevent your Story Feed from rendering as we host content elsewhere. Your CSP needs to include our Story Feed CloudFront URL:
d1hgczpbubj217.cloudfront.net
CSPs vary - yours may have existing entries. The following is an example of how a policy could look, with our URL highlighted:
default-src 'self'; script-src d1hgczpbubj217.cloudfront.net 'self'; frame-src 'self';
This should be escalated to your website admin as it can get quite technical, here is a web reference which breaks it down in full: https://developer.mozilla.org/en-US/docs/Web/HTTP/Guides/CSP
